TeamsExplore all teamsCreate TeamAdd team membersEdit TeamEdit Team Member AccessTeam Member AttributesUpdate Team ProfileView Team ProfilesCreate Join LinkDelete Team
OrganizationsCreate OrganizationAdd Organization TeamAdd Organization StaffEdit OrganizationOrganization Member AttributesOrganization Team AttributesOrganization Privacy Policy
BadgesCreate New BadgeAssign BadgeEdit BadgeBadge Assignment
OSM Teams V2.2.1
OSM Teams v2.2.1 was released 5/26/23.
API documentation for OSM Teams can be found at https://mapping.team/docs/api
Dashboard
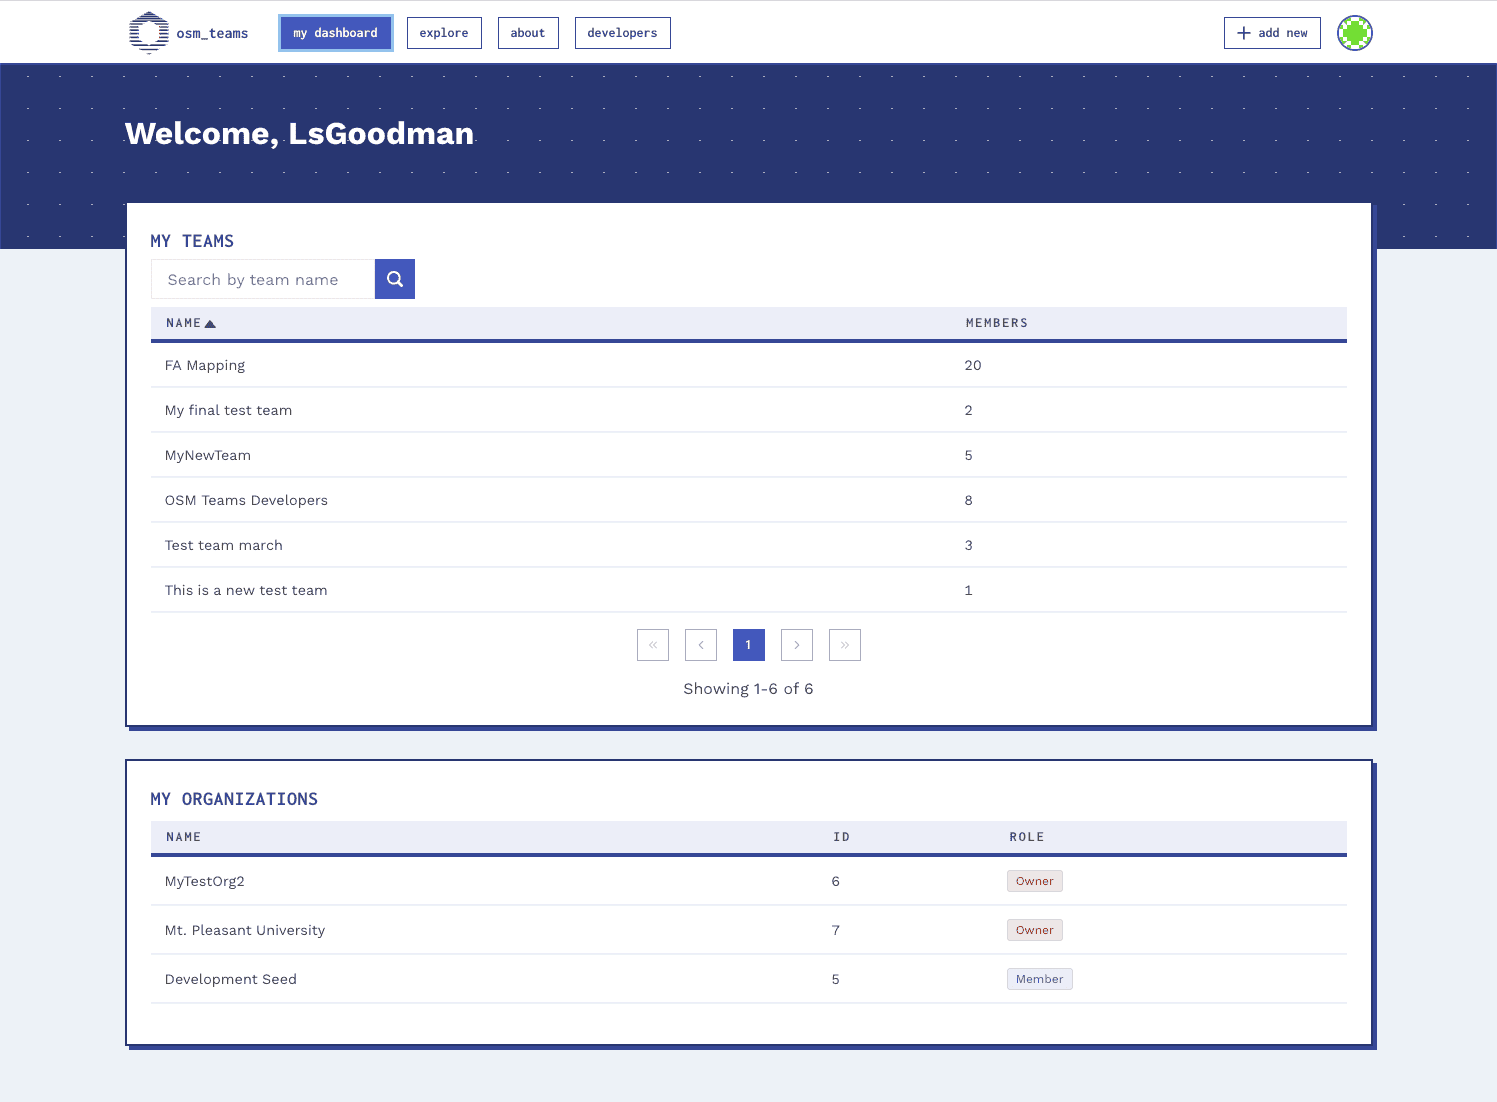
The “dashboard” page provides users with a view of the organizations and teams which they are members of. From the dashboard page users can see the number of members in each team, see their roles within an organization and visit the listed teams and organizations.
Teams
Each OSM Teams team is a collection of OSM user ID’s. Teams are created with a name, hashtag, description and location. Teams may include a link to an Organized Editing Policy, and teams may be public or private.
Explore All Teams
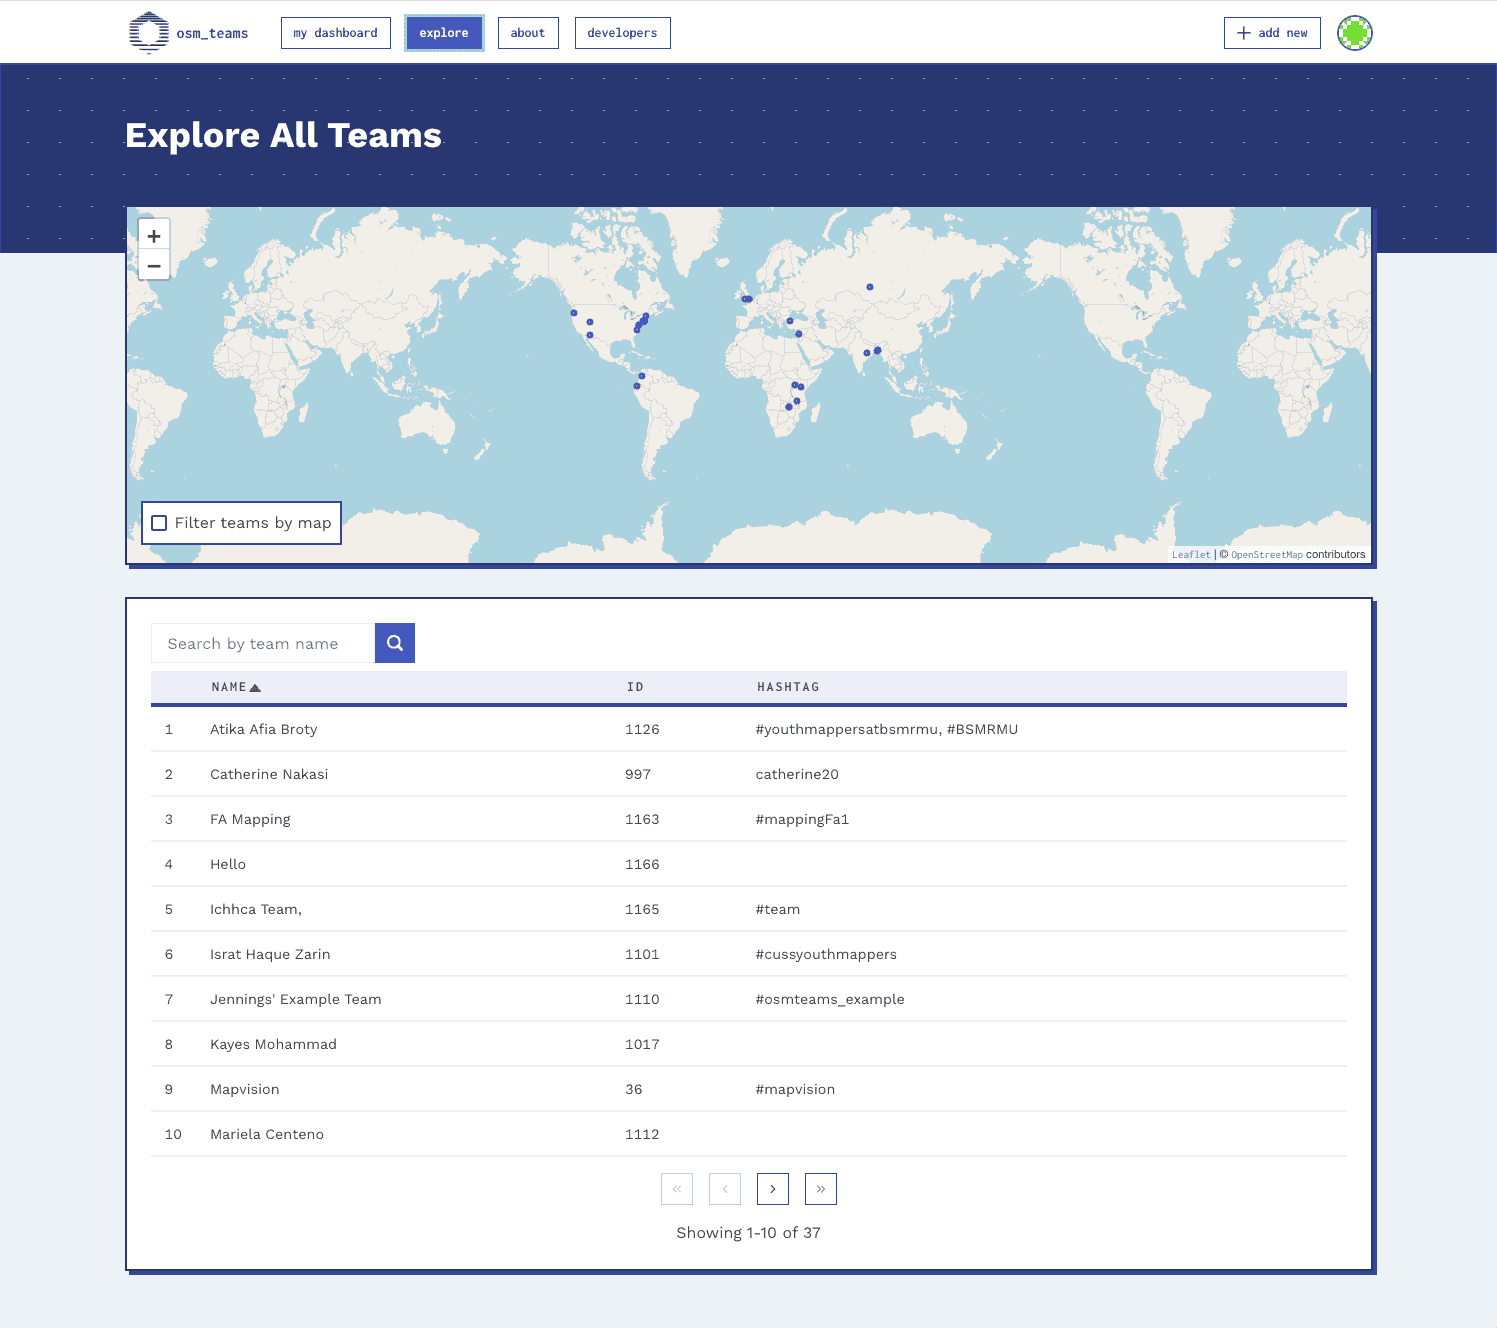
All public teams are visible at the /teams URL, accessible by visiting the link “Explore Teams”.
Teams can be filtered by your current map viewport by clicking the checkbox “Filter teams by map.”
Create New Team
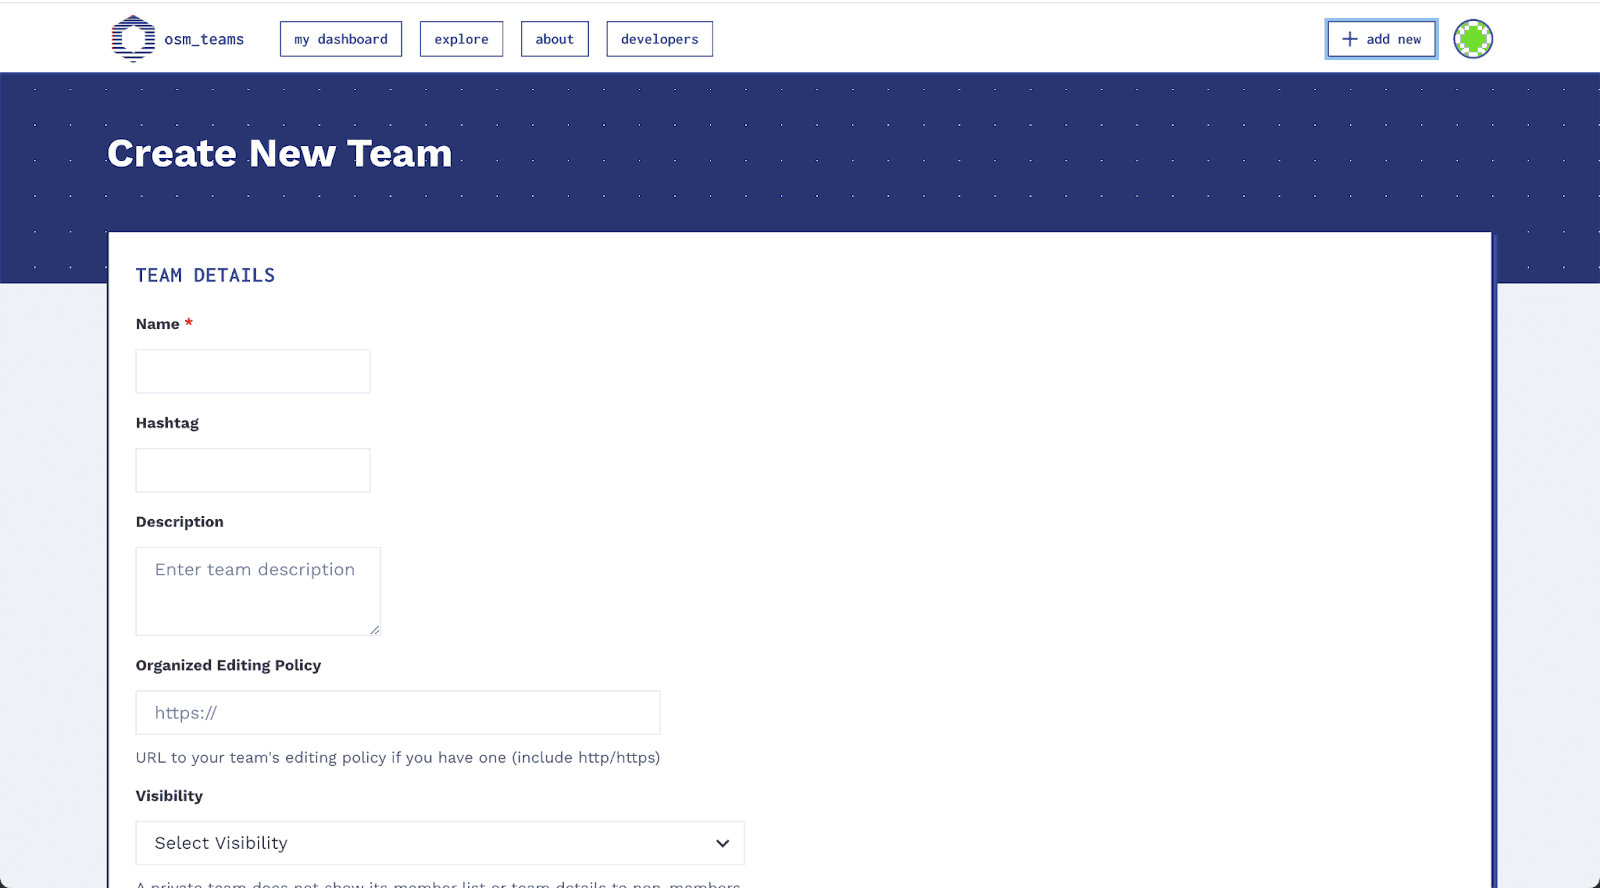
To create a new team, first click Make New Team from the sidebar. The Team Creation page provides form fields for the team name, hashtag, description, organized editing policy, visibility and location.
Teams may optionally also be indicated as belonging to an organization.
Team location is optional. Select the team location from the map by zooming and panning to the correct point.
Add members to a team
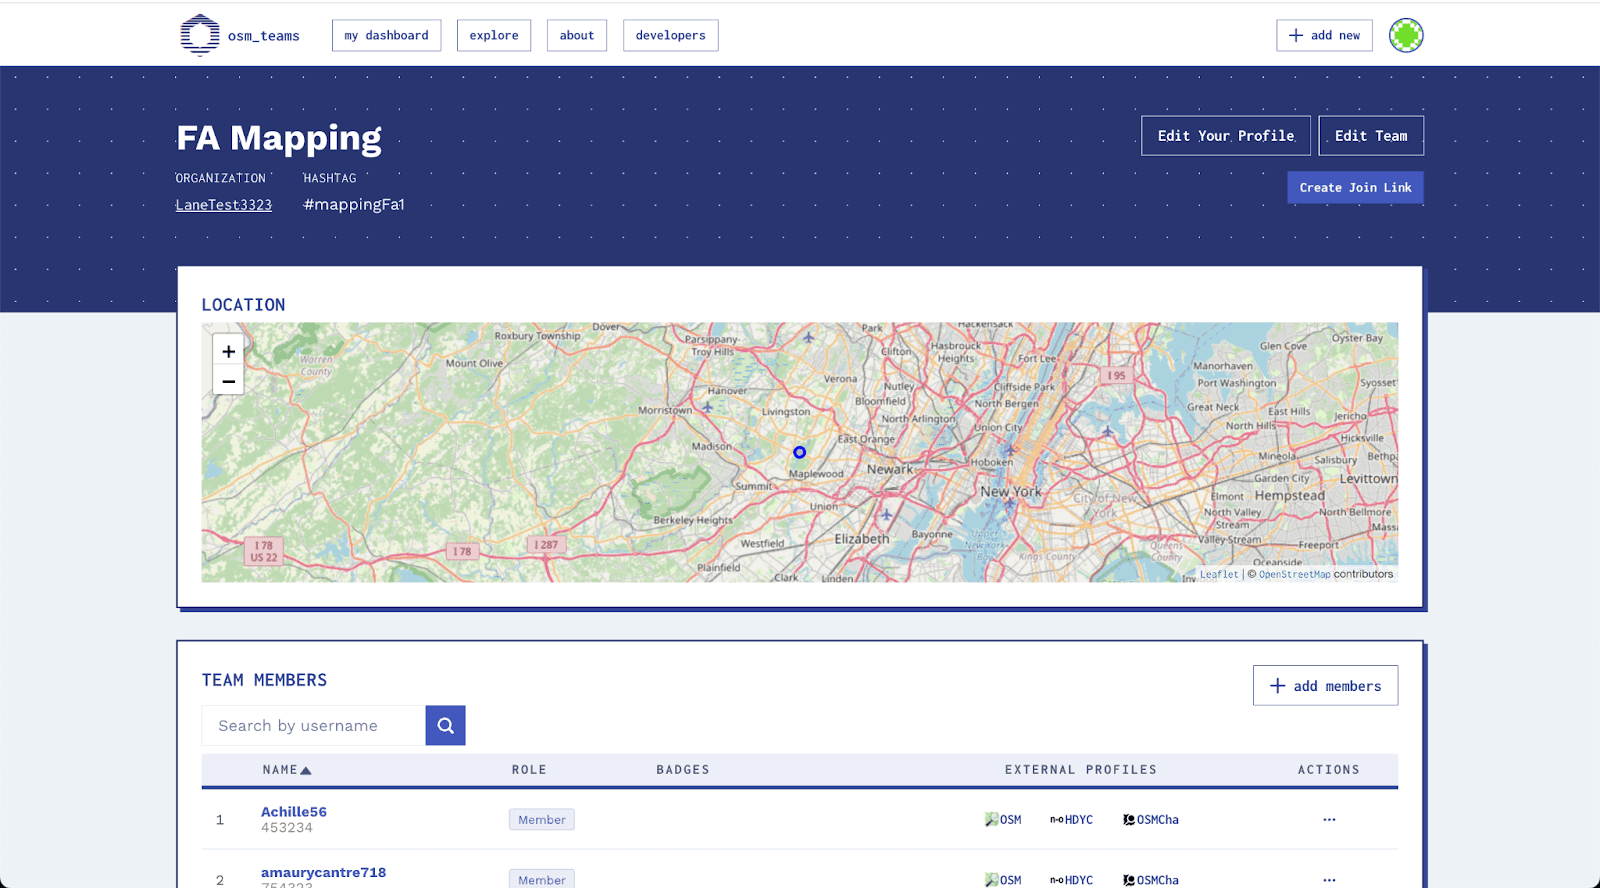
To add a member to a team, navigate to the “TEAM MEMBERS” section of the team page, and click “+ Add members.”
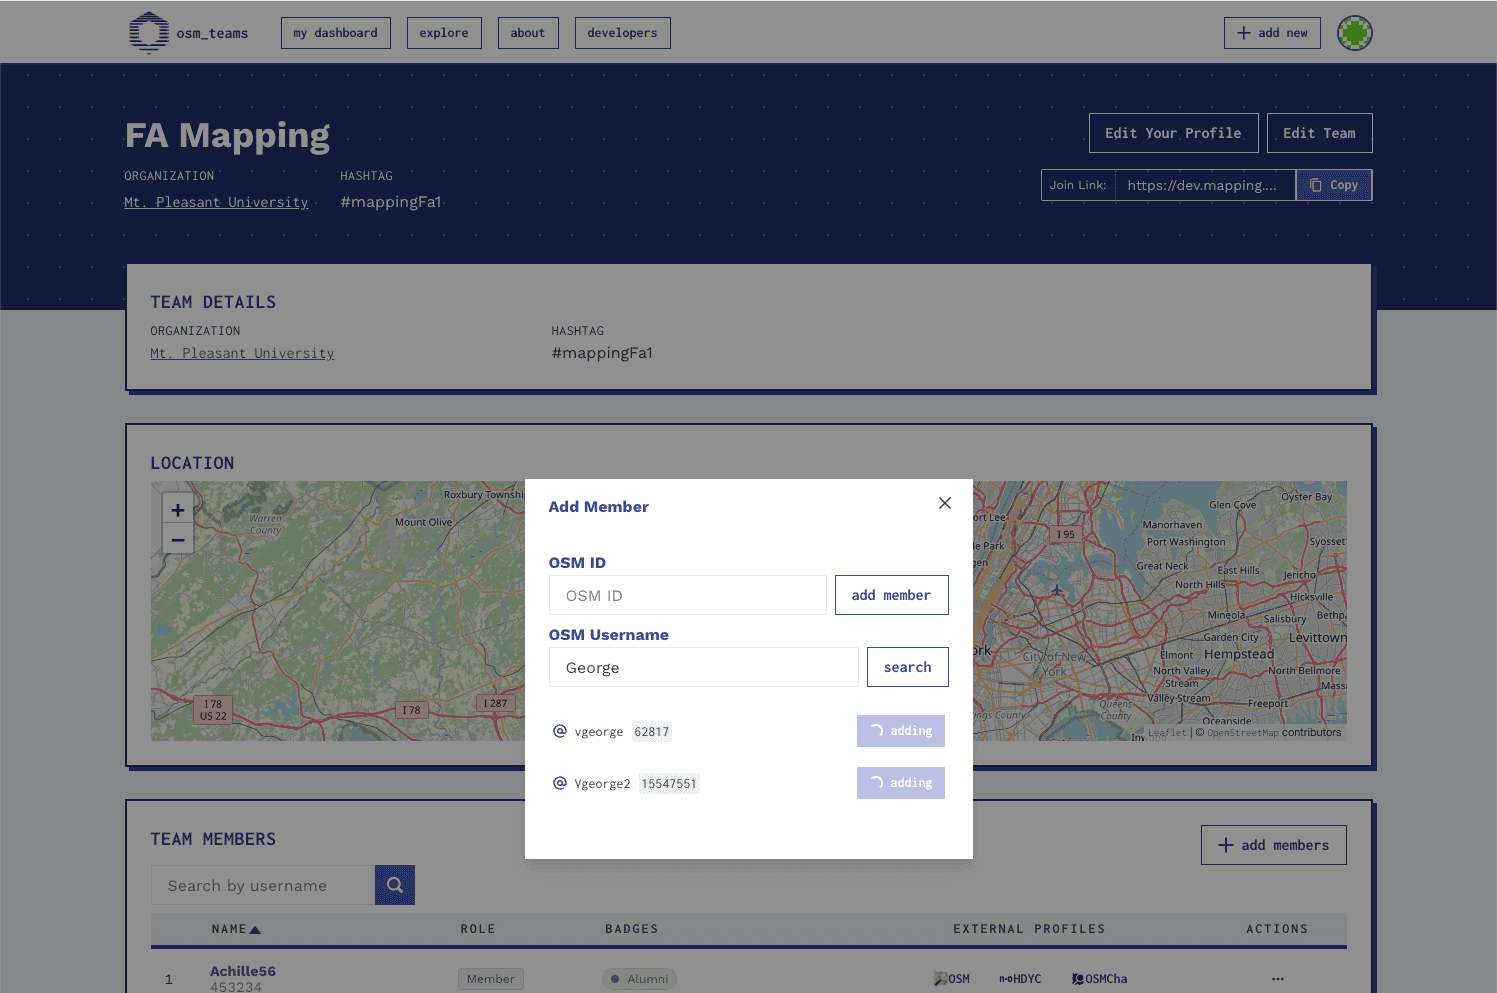
A user can be added to a team either viaOSM ID, or by username. To find an OSM User's ID, search the OSM User Names Database at http://whosthat.osmz.ru. Search directly for OSM Username from within OSM Teams
Once added to your team, the team member's username will be displayed in the table along with their OSM ID and links to additional OSM Profiles.
Edit Team
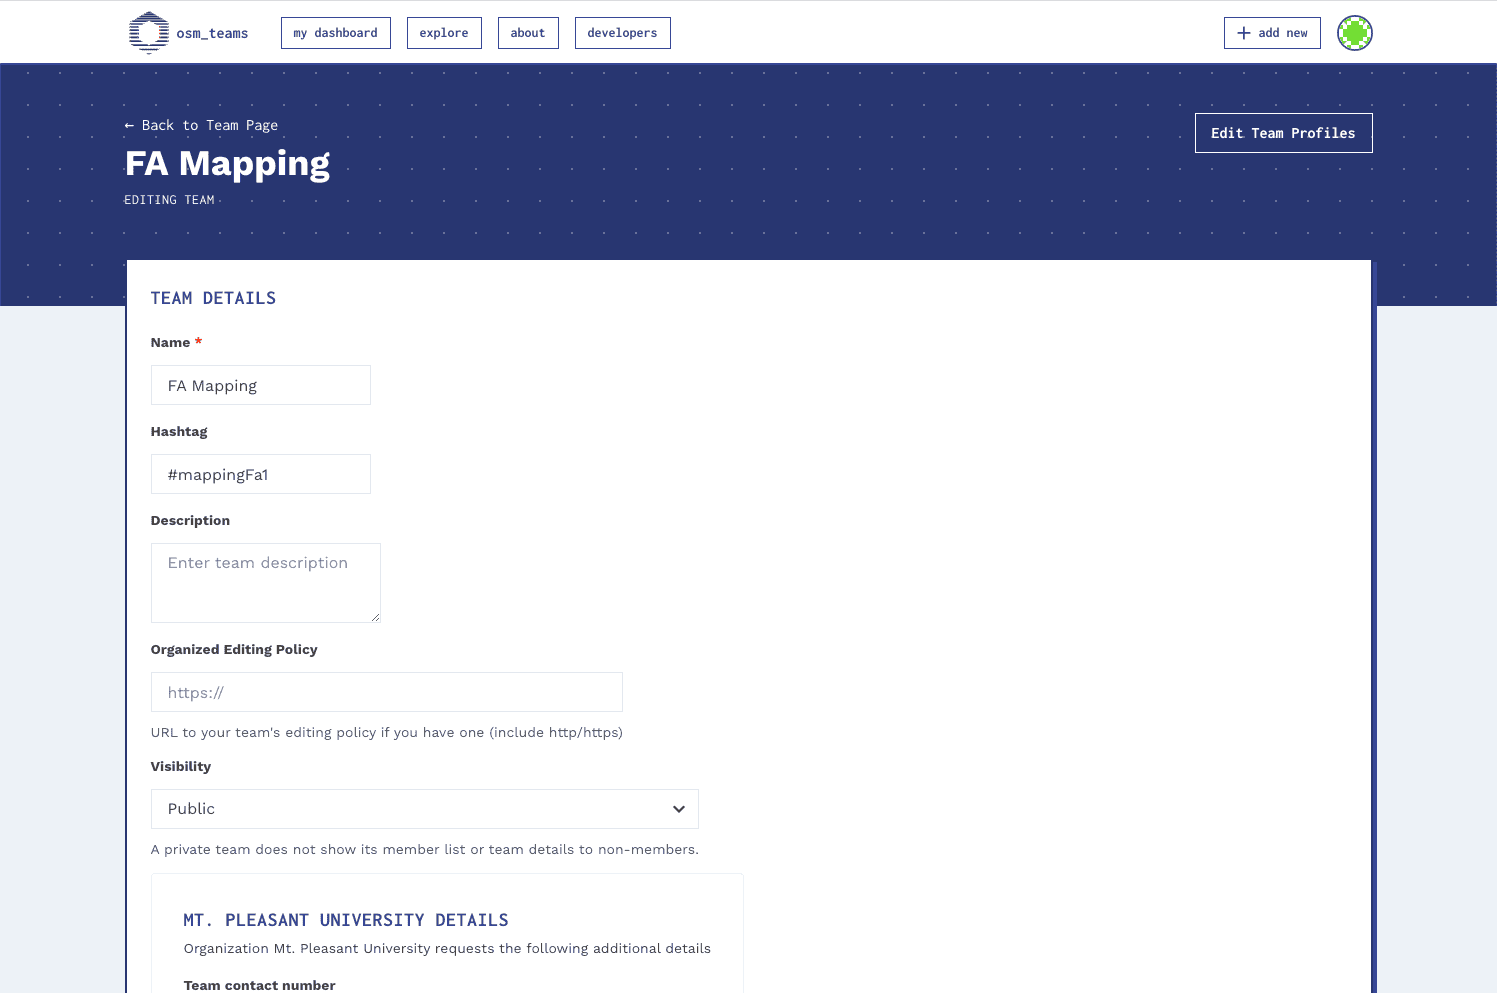
Click “Edit” in the main Team Details section of a team page to update a team's details, location, and visibility
Team member actions: Edit Access & Assign A Badge

To update team member access, click on the ellipsis icon in the “ACTIONS” column of the team members table. The actions drop down displays the following available options:
- Remove team member
- Promote team member to team moderator
- Demote team moderator to team member
- Assign a badge (available for teams which are part of an organization)
Add/Edit Team Member Attributes
Team moderators may request additional details for team member profiles, which members can then update on their team-specific profile. These attributes provide more information for the team on the members, and allow team moderators to ask questions or seek supplementary profile information from team members outside of the OSM standard profile information.
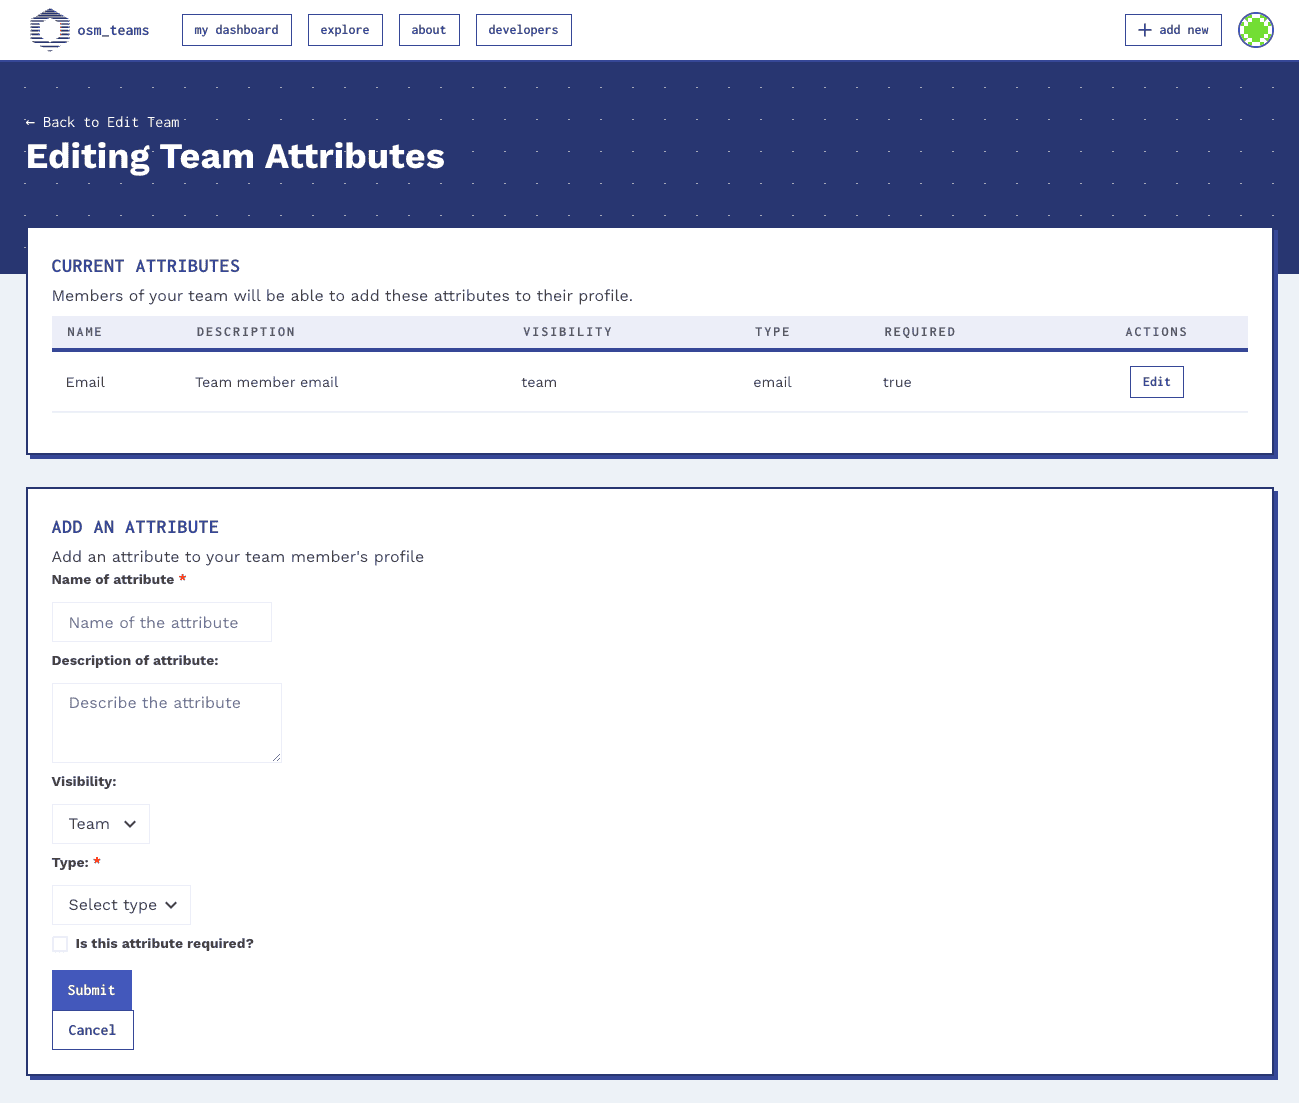
To add attributes, click “EDIT” on the team page, and then click “EDIT TEAM PROFILES.” If no attributes have been created yet, click “ADD ATTRIBUTE” and provide the requested information. Each attribute can have a name, description, visibility settings, type, and be required or optional. Attribute types can include text, number, email, URL, date, telephone, color, and gender. When filling in their individual team profiles, team members will be presented with the appropriate html input corresponding to each attribute type. Attributes may be visible only to other team members, or may be public.
Update Own Team Profile
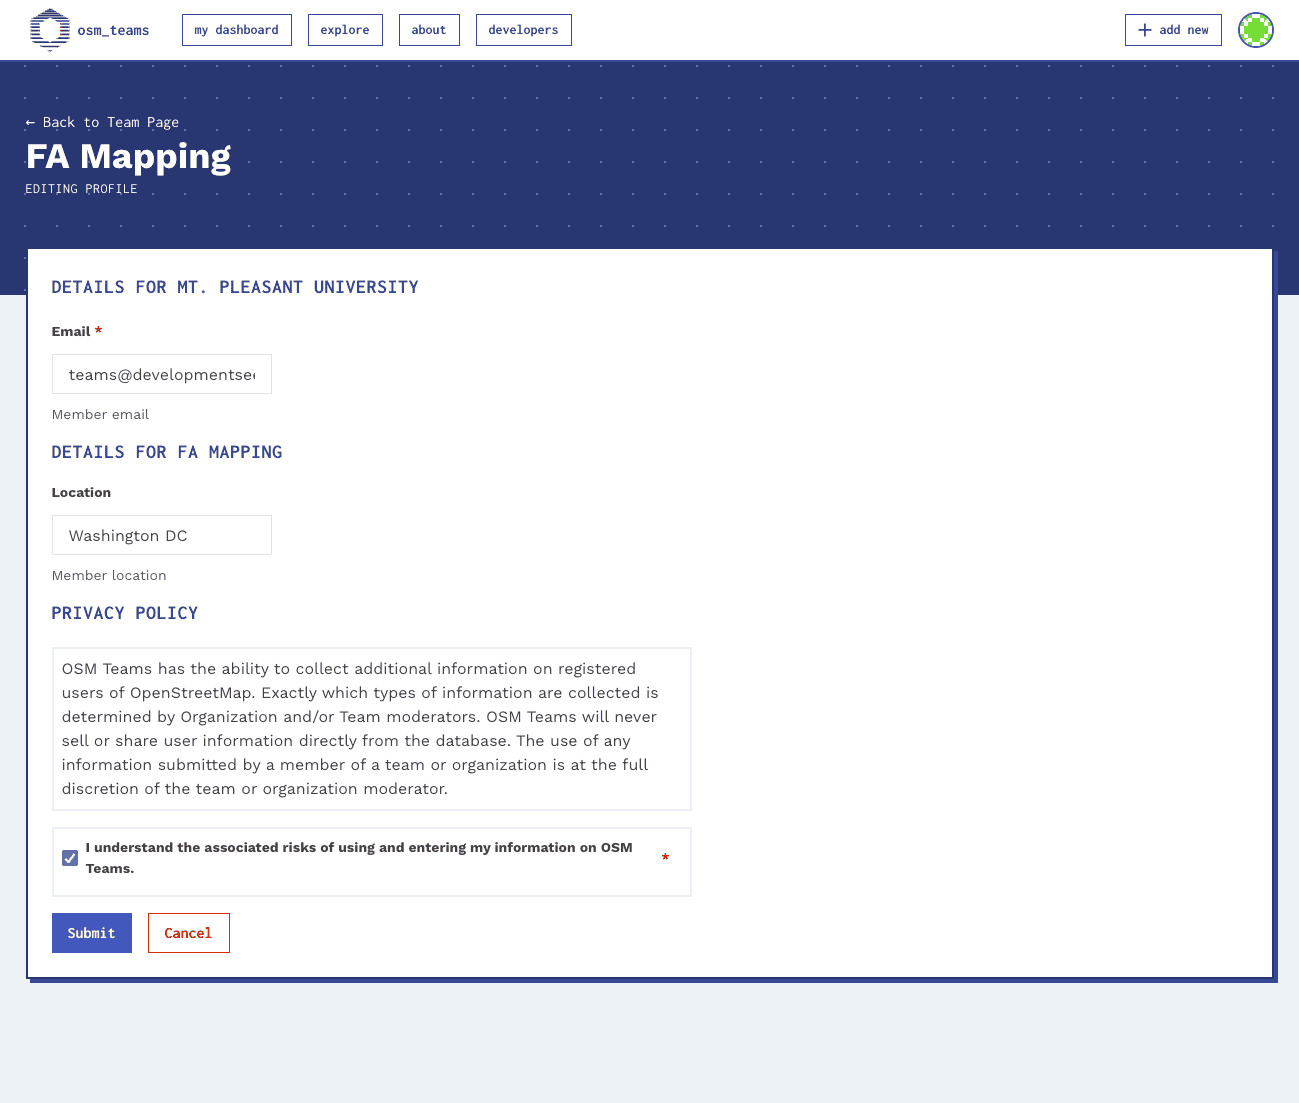
Team members can answer questions or fill additional requested information on their profile on each individual team page. Click “EDIT YOUR PROFILE” from the team page to fill in the attributes that have been requested by the team.
View Team Member Profiles
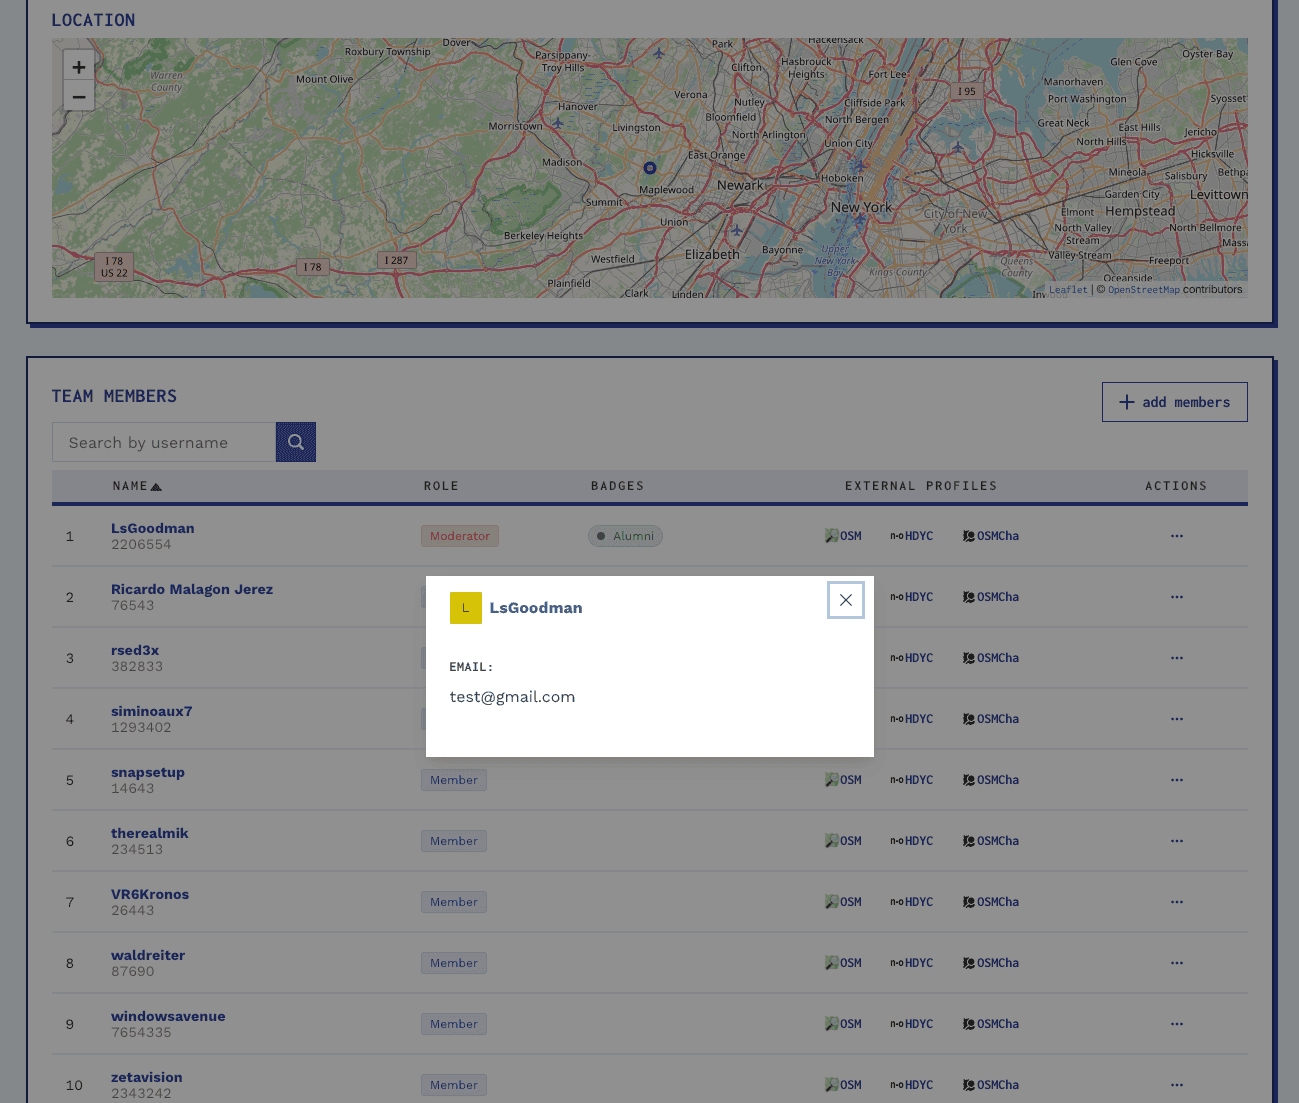
To view the information submitted by team members on the individual team profile, click the user name in the Team Members table on the team page to see the User Profile modal.
Create Join Link

Team moderators may provide a Join Link rather than manually inviting all team members by OSM User ID. To create a join link as a moderator, visit the team page and click “Create Join Link.” The link generated can be shared with any member via email, message, etc. Recipients will be able to paste the link into their browser. If they are not already registered on OSM, they will first need to create an OSM user account. Following the creation of an OSM user account, they may re-visit the invite link and authenticate the OSM Teams application via the OSM auth login. Once they have successfully logged into OSM Teams, the invitation to the team will be automatically accepted.
Delete Team

On the “Edit Team” page, click “DELETE THIS TEAM” in the “Danger Zone” section at the bottom of the page.
Organizations
Organizations are “Teams of teams.” They allow a parent level grouping of teams. Within an organization, users may have an organization owner or organization manager role. Teams may optionally belong to an organization.
- Organization Teams - all organizations associated with an organization
- Organization Members - all members of the teams associated with the organization.
- Organization Staff - the users with the designated “owner” or “manager” role for that organization. Only organization staff can add new teams to an organization.
- Organization Details - the name, description for an organization
- Organization Badges - manually created and assigned badges for organization members
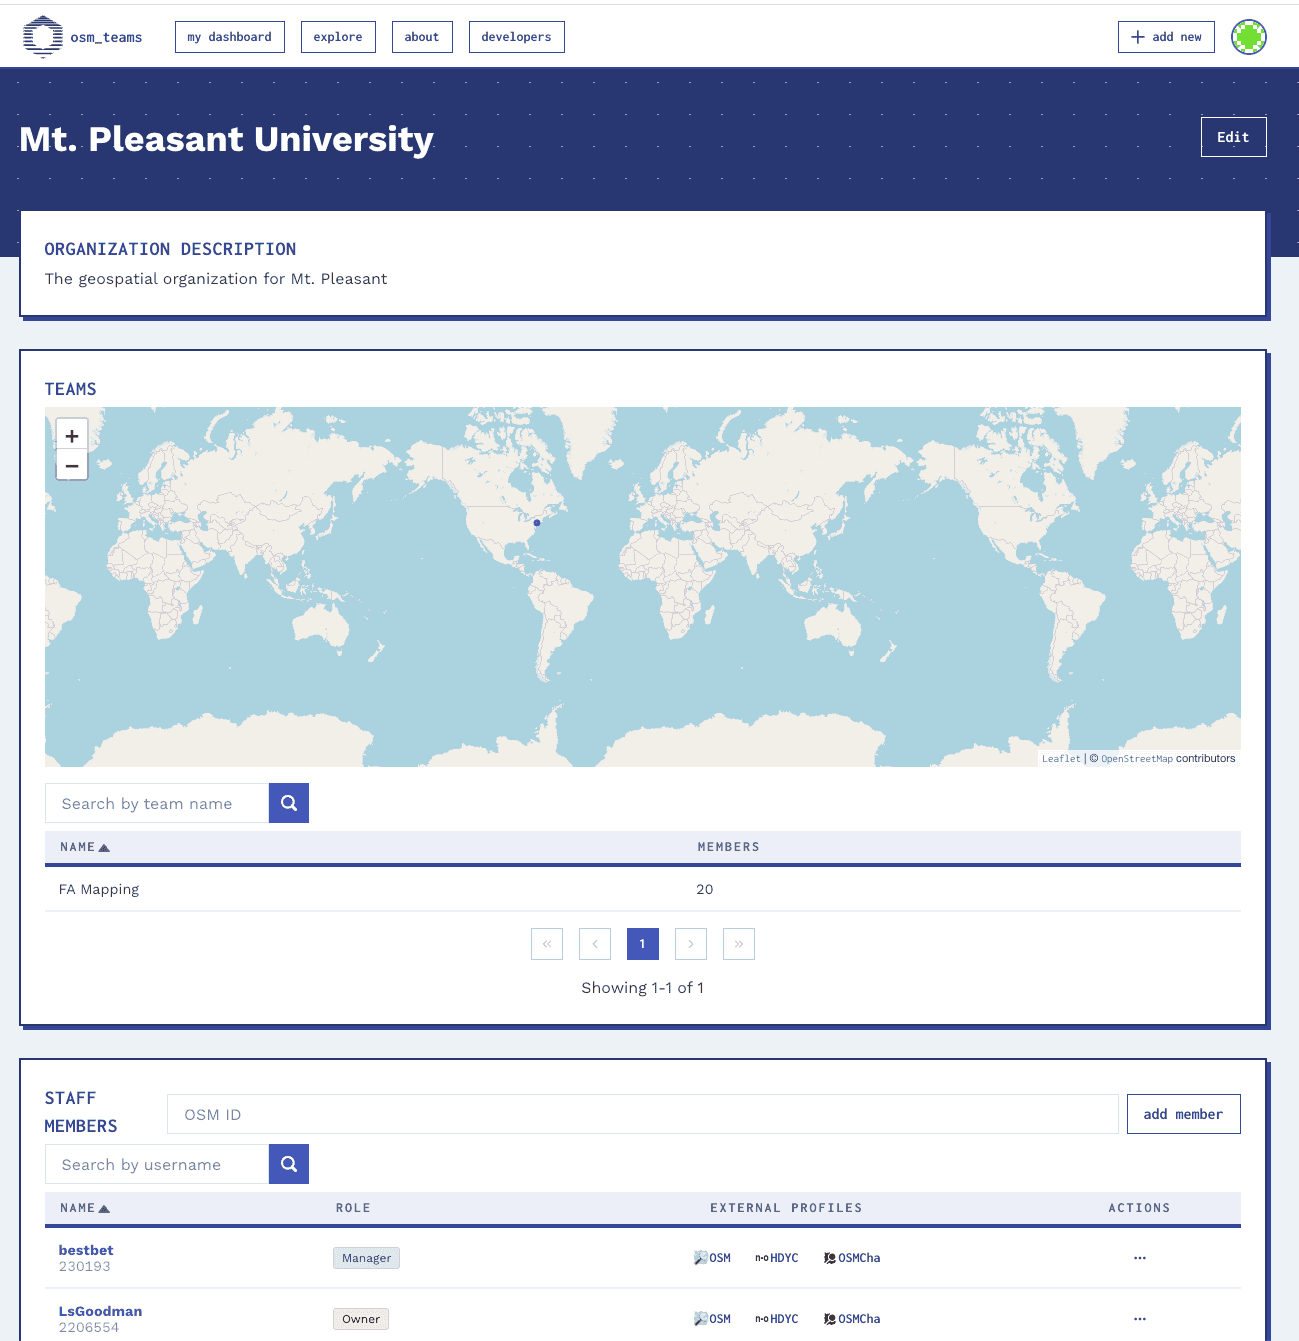
Create an Organization
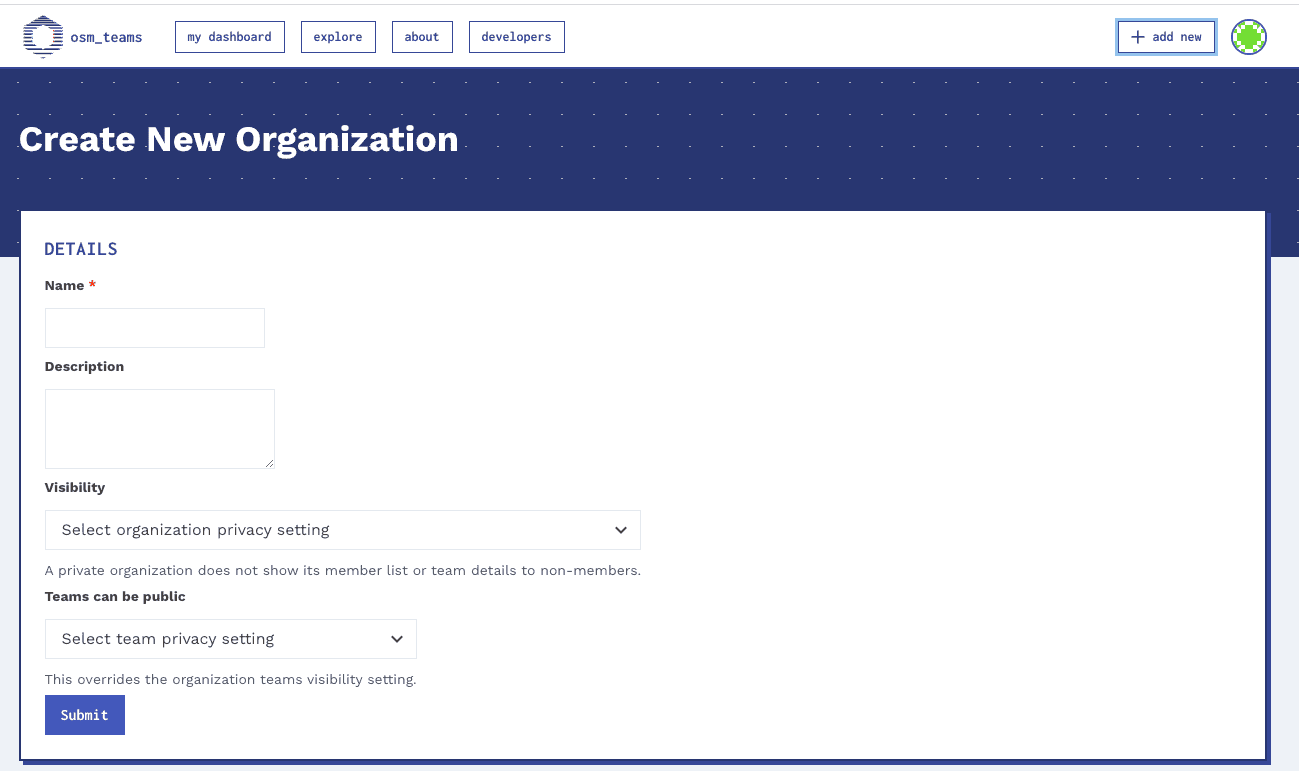
Click “New Organization” from the “+ add new” button in the top navigation bar of the application to create a new organization. Organizations may be private or public. Organizations can also set a privacy setting for teams that overrides the privacy setting of all teams within the organization. Creators of organization are automatically the owner of that organization.
Add a Team to an Organization
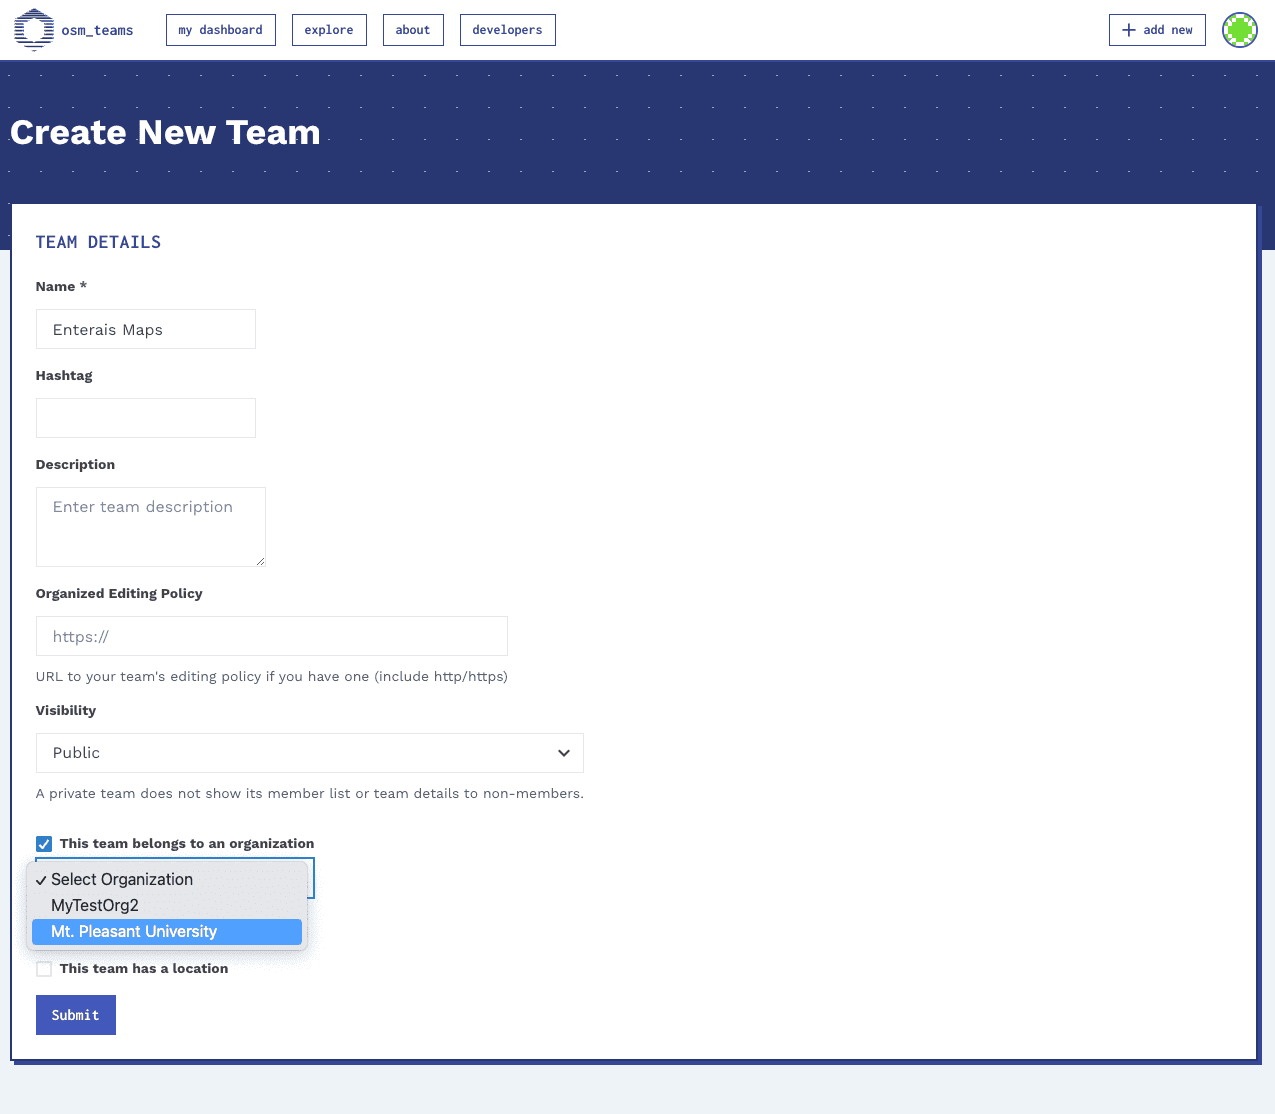
To add a team to an organization, check the box “This team belongs to an organization” when creating a new team. The list of organizations you own or manage are then displayed, allowing you to select the applicable organization.
Add Staff to Organization
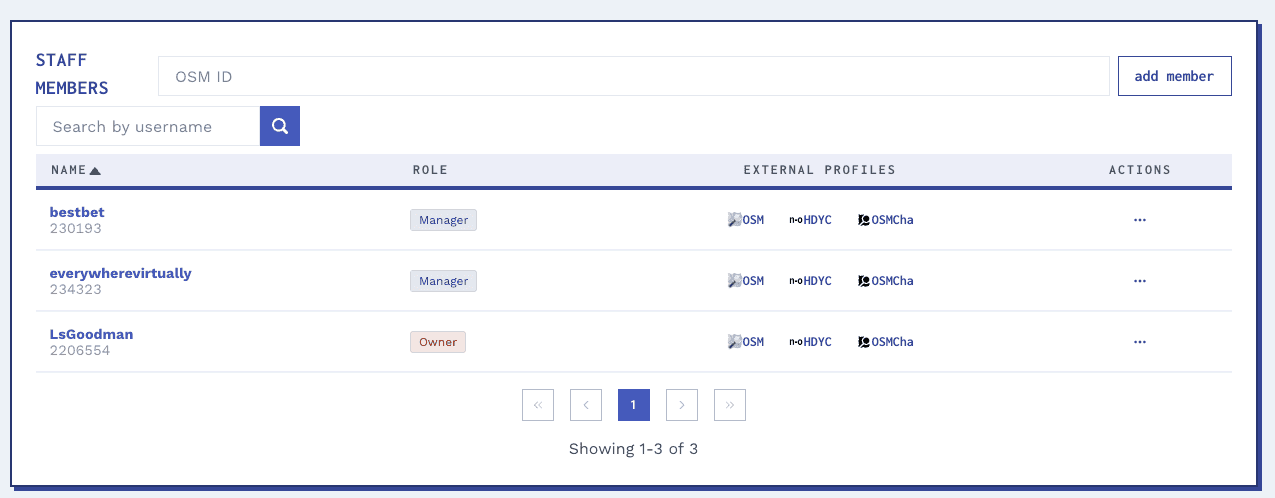
To add a staff member to an organization, navigate to the “STAFF MEMBERS” section of the team page, and enter a user's OSM ID into the “Add member” input field. Once added to your team, the staff member's username will be displayed in the table along with their OSM ID, role and links to additional OSM Profiles. Owners may create teams for an organization, update other staff members' roles, and update organizational information. Managers may create teams for an organization, but may not update other staff roles or organizational information.
To find an OSM User's ID, search the OSM User Names Database at http://whosthat.osmz.ru.
Edit Organization
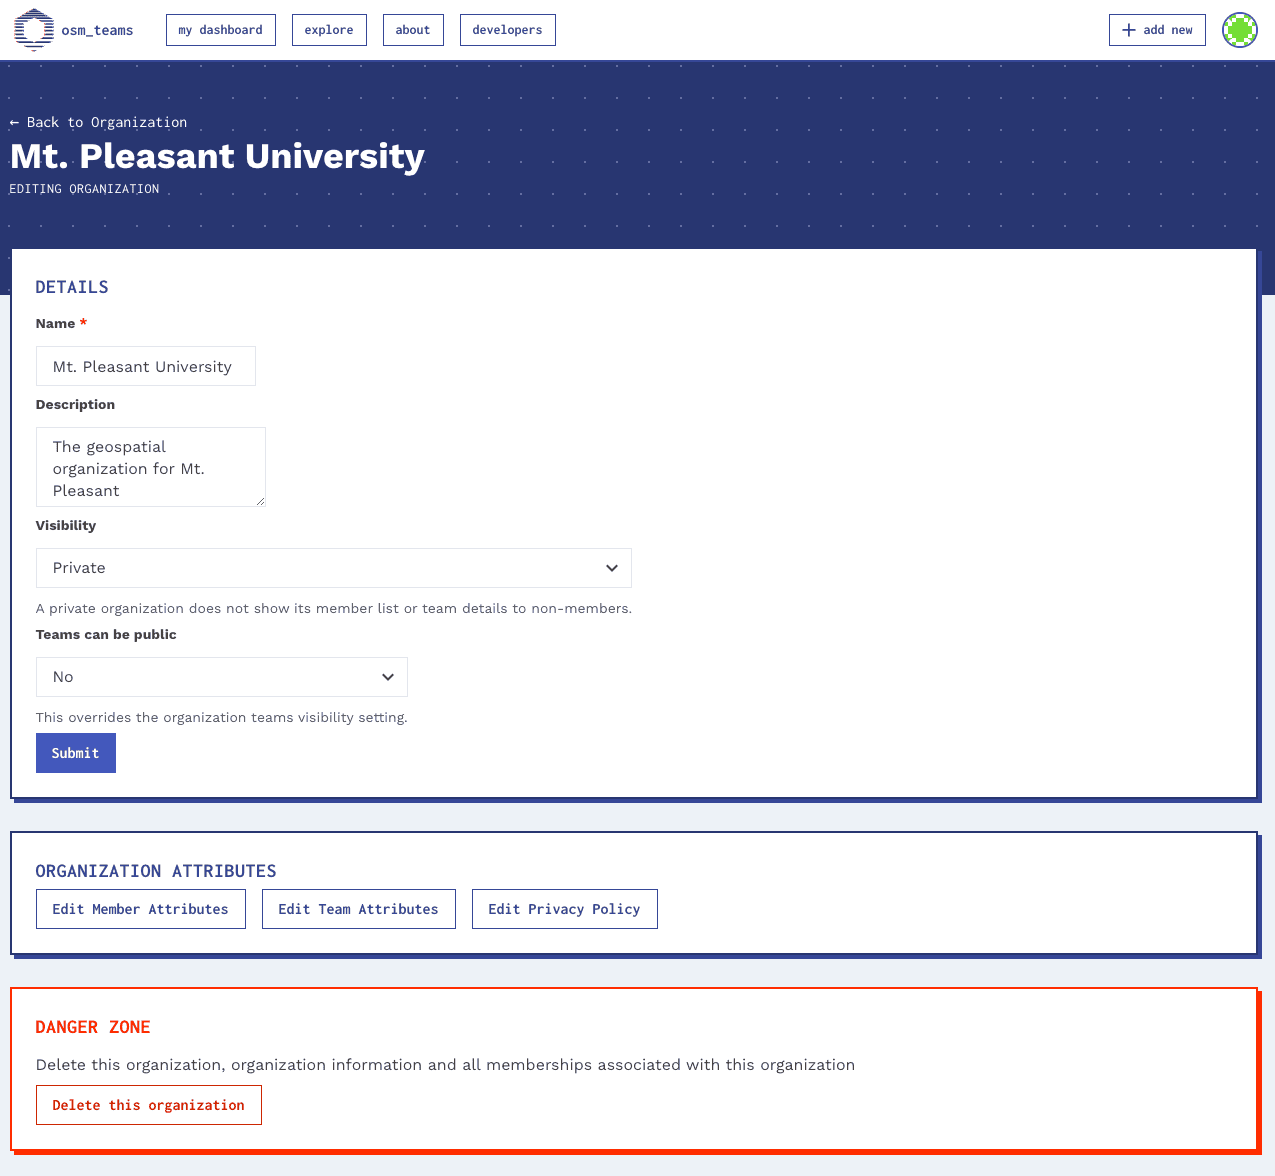
Click “EDIT” in the main Organization Details section of an organization page to update an organization's details, policies, attributes and visibility.
Add/Edit Member Attributes
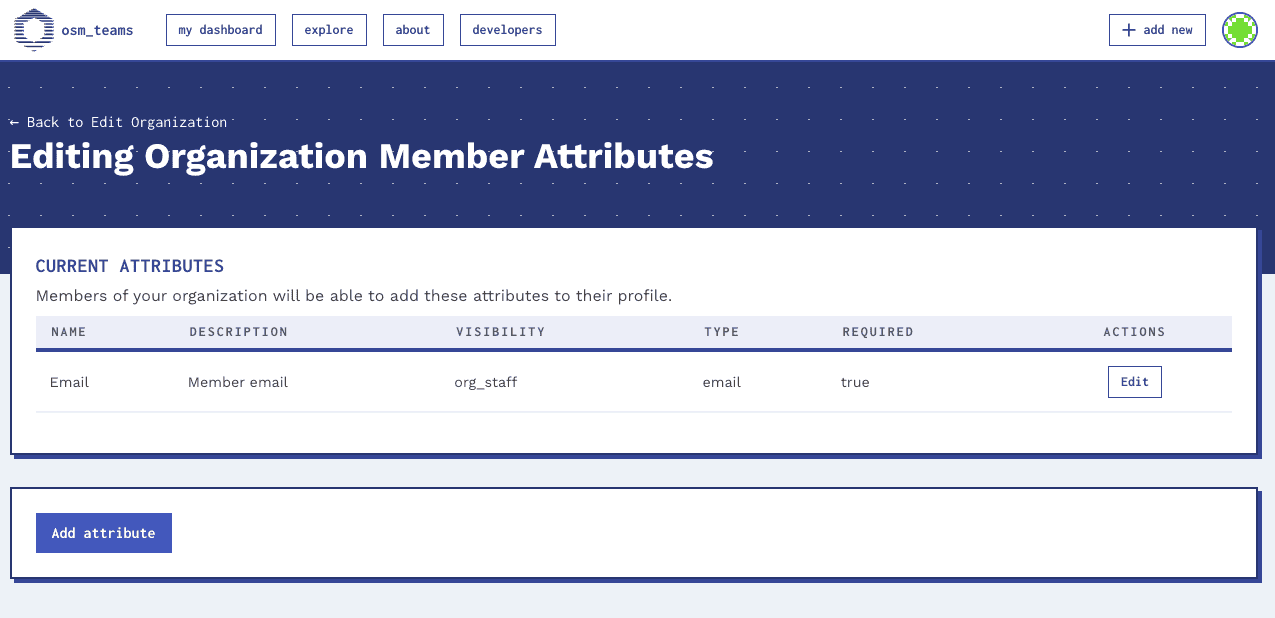
From the “EDIT” organization page, click “EDIT MEMBER ATTRIBUTES.” Member attributes set at the organization level are available for members in any team within the organization. In addition to the settings available for team-level member attributes, organization-level attributes can also be set to be visible to the public, only to organization members and staff, or only to organization staff.
Add/Edit Team Attributes
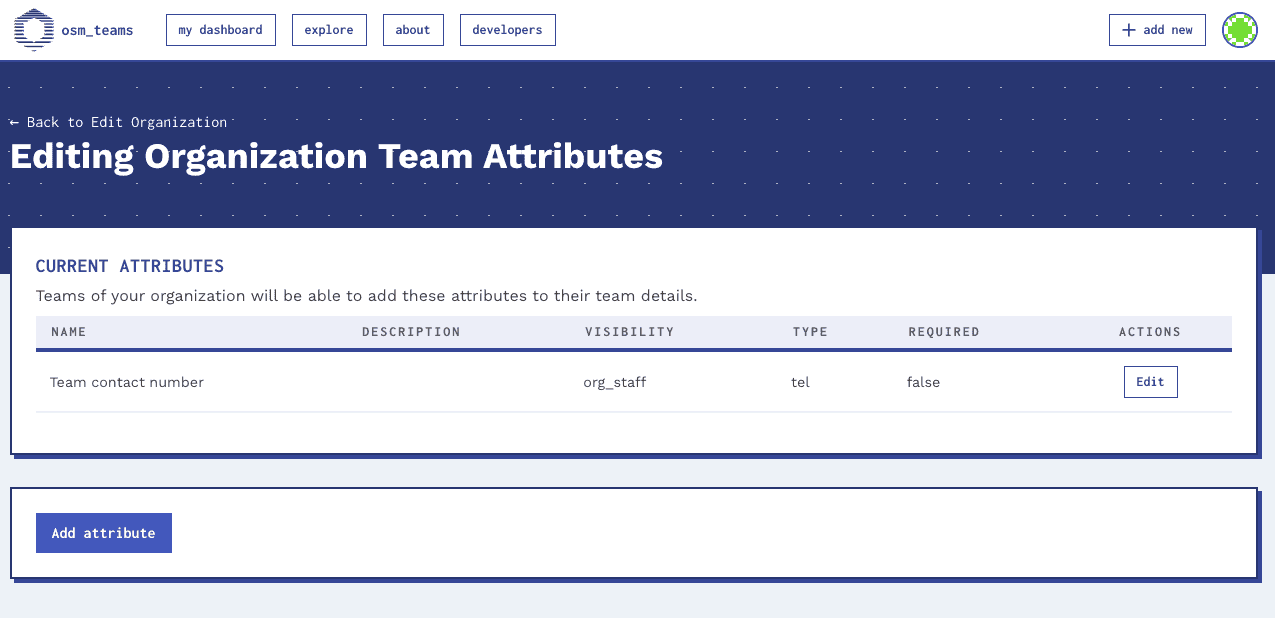
From the “EDIT” organization page, click “EDIT TEAM ATTRIBUTES.” Team attributes set at the organization level are available for any team within the organization. When a new team is created within an organization, team managers can fill in the additional requested details for the team. Similarly to team-level member attributes, organization team attributes can also be set to be visible to the public, only to organization members and staff, or only to organization staff.
Add/Edit Privacy Policy
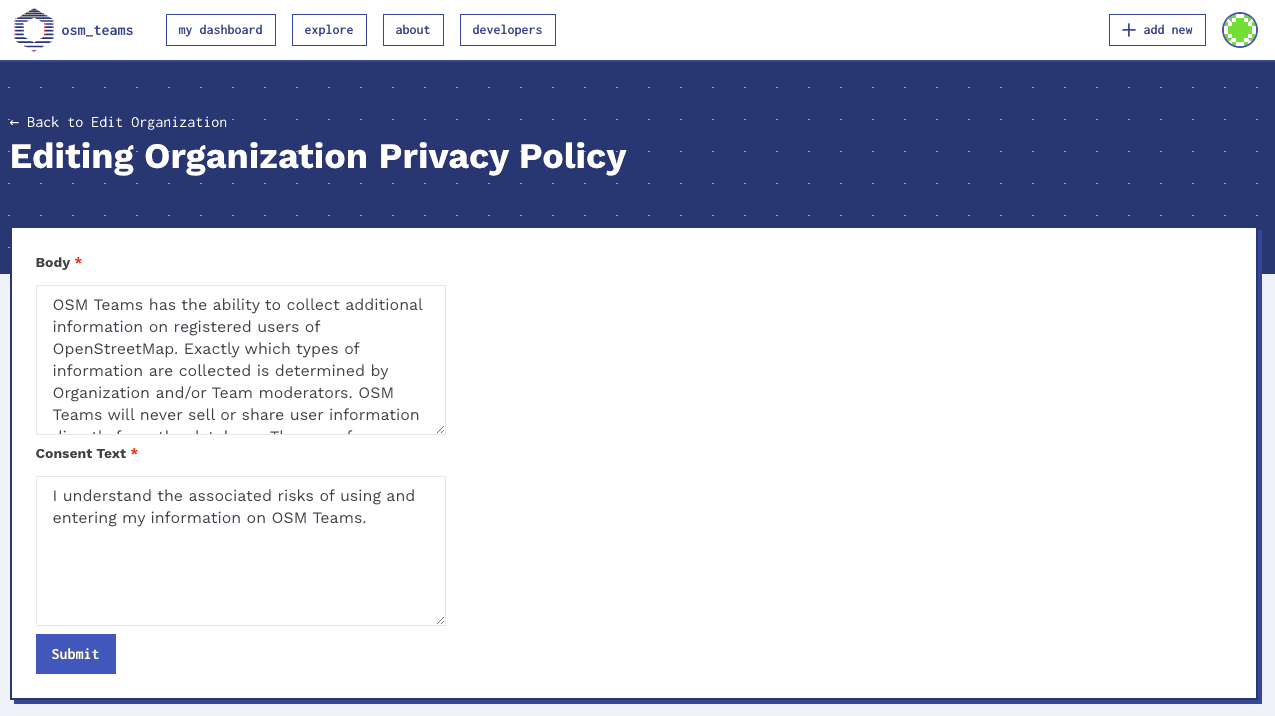
From the organization “EDIT” page, click “EDIT PRIVACY POLICY” to create a custom privacy policy for the teams within the organization.
Organization Badges
Create New Badge
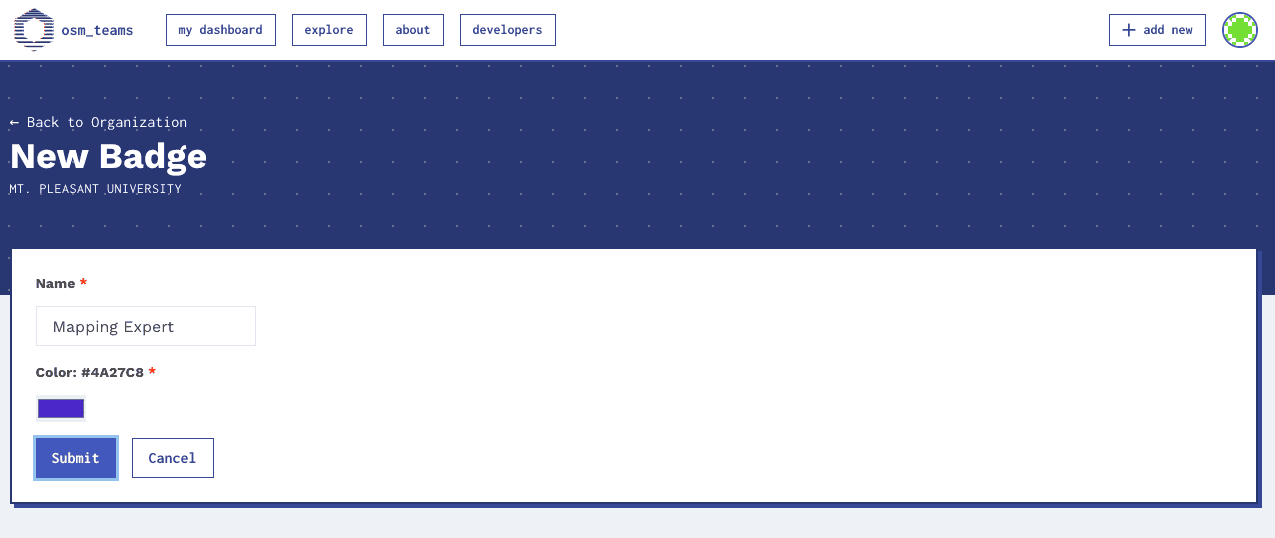
Badges can be created to signify significant user roles or achievements. Badges are created via the BADGES section on the organization page. Click the “ADD” button above the badges table, and then add a name and color for the badge in the badge creation screen
Assign A Badge
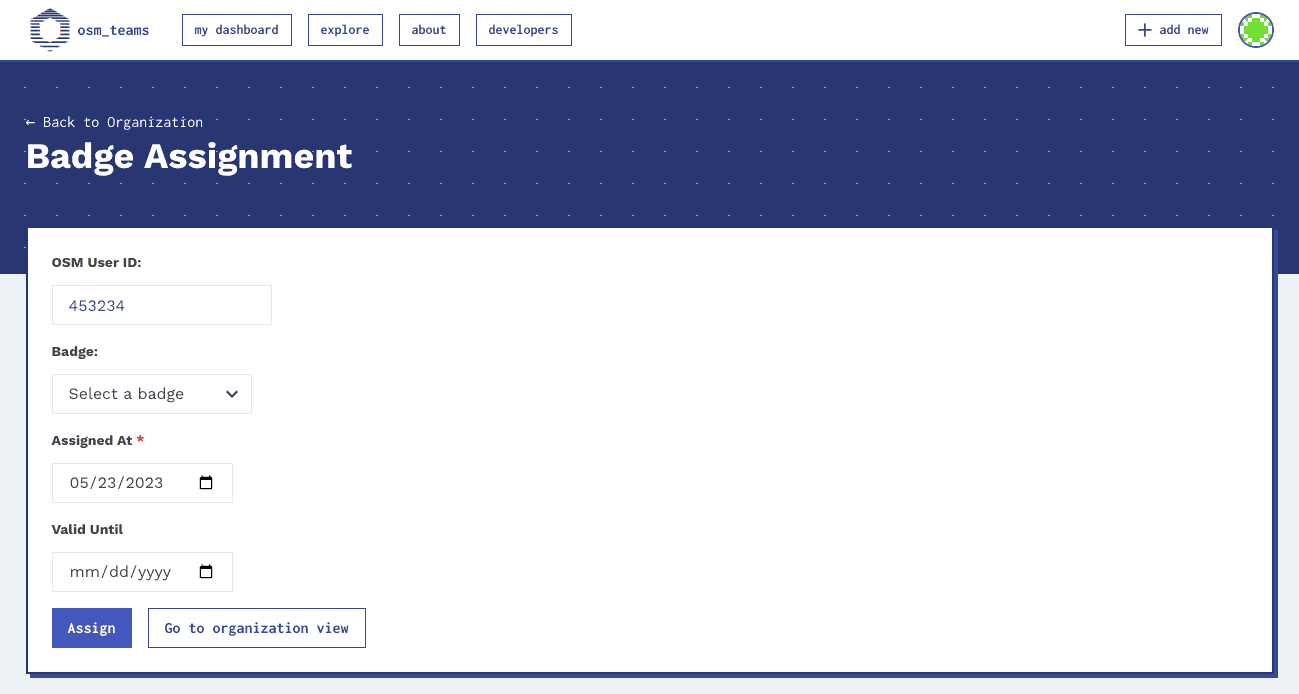
To grant or assign a team member a badge, click on the ellipsis icon in the “ACTIONS” column of the organization members table and click “Assign a badge.” The badge assignment page displays the selected user's OSM ID, and permits selection of any badge created on the organization level. The assigned date may be changed to an earlier or later date if desired; it is set automatically to the current day's date. If desired, a badge expiration date may also be added for time-limited badges. The badge will now appear in the “Badges” column for the selected user within the organization members table. Badges may also be assigned from the team members table of a team page, when the team is a part of an organization.
Edit a Badge
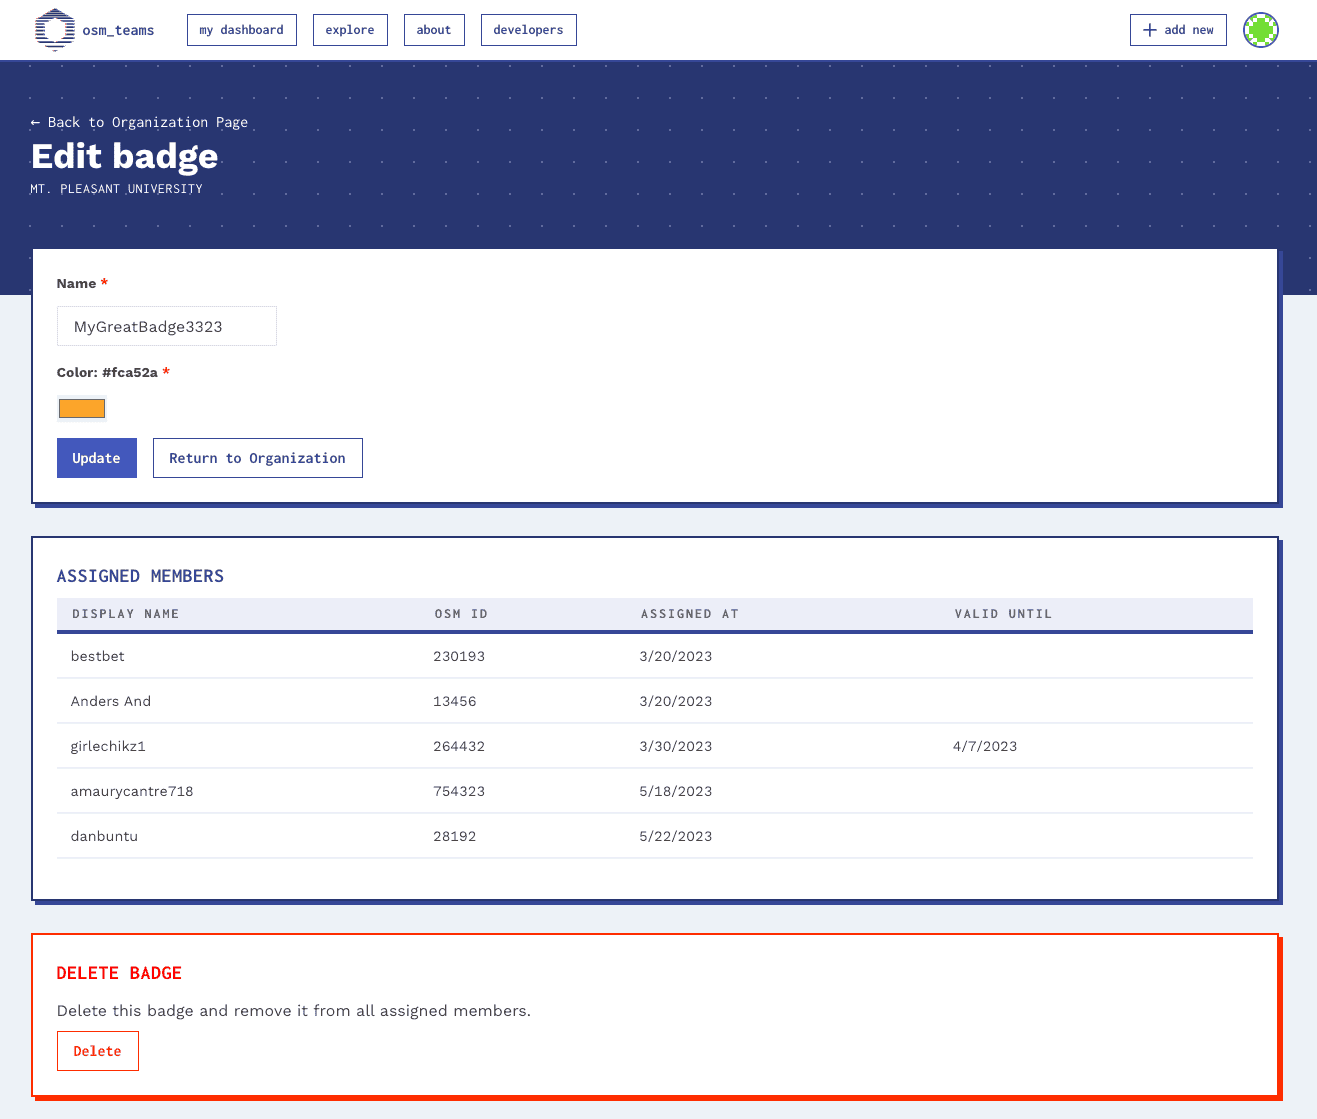
From the BADGES table on the organization page, click a badge to edit the badge settings and view the list of assigned users. From the Edit Badge page you may update a badge name and color, and delete a badge.
Edit a Badge Assignment
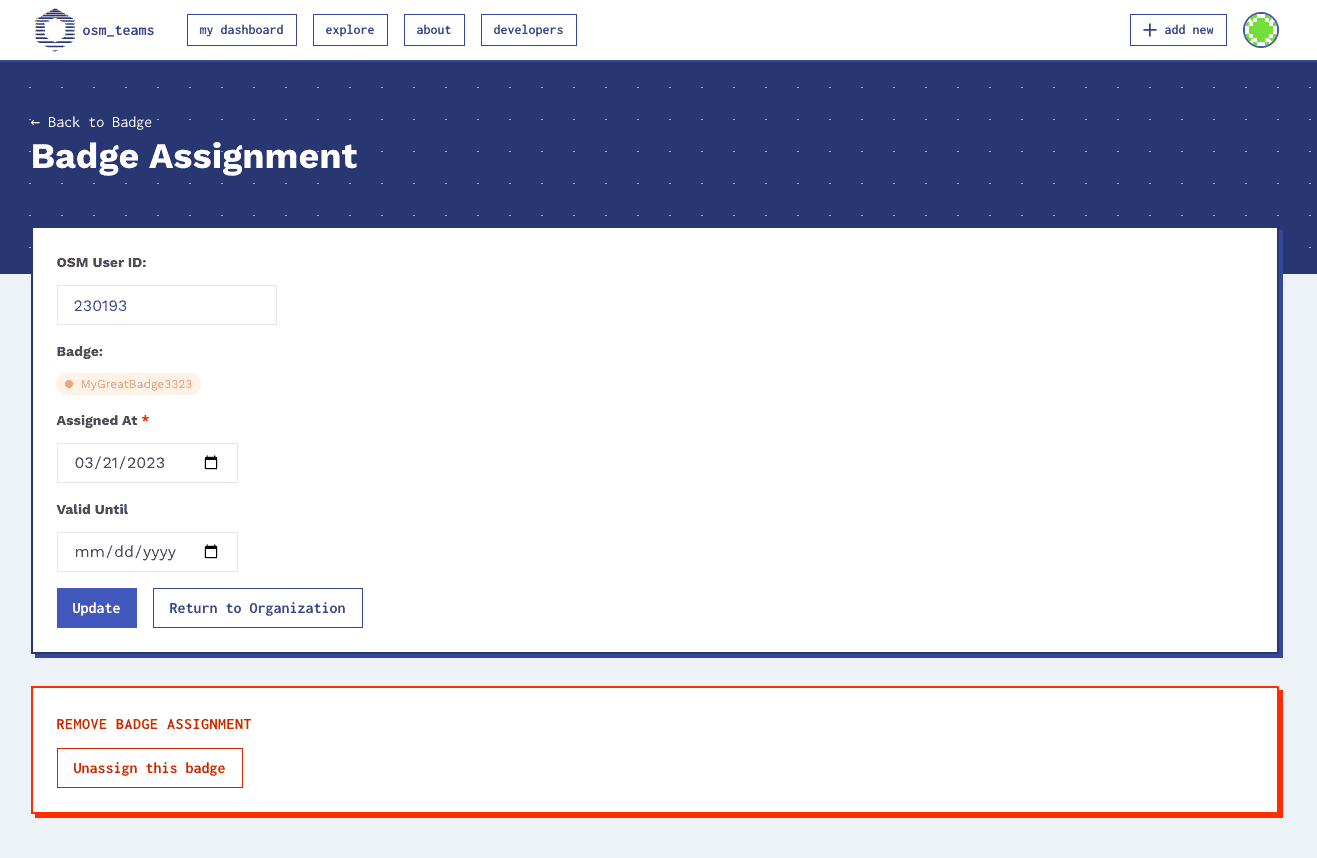
To edit the badge assignment for an individual user on a badge, visit the Edit Badge page and then click on a user within the Assigned Members page. From the Badge Assignment page you may change the badge assignment and expiration date, or unassign a badge from the selected user.